Booting ESXi in UEFI mode on Cisco UCS
Note: This process should work for Windows and Linux as well. Verify the EFI boot path for the OS.
Through ESXi 6.0 I have run my hosts in Legacy BIOS mode on UCS. There just was nothing significant enough worth the hassle of switching to UEFI on UCS (rather: I had more important fires to put out…). The one feature I did want, Secure Boot, wasn’t supported by ESXi 6.0 and earlier.
vSphere 6.5 introduced support for Secure Boot. Mike Foley has a great blog post about Secure Boot in ESXi 6.5. If you are starting your 6.5 upgrade and are using Legacy mode, consider switching to UEFI. It’s minimal effort and increases the security of your hypervisor.
Since I was working on rolling out a new UCS environment with ESXi 6.5 in a remote office environment, this felt like a great time to switch to UEFI and get the benefits of Secure Boot. This is not complicated on UCS, but there is a new Boot Policy that must be created. This policy can be reused for Windows (and other OS).
Creating a new UEFI Boot Policy
Environment
For this environment I was using a Cisco UCS Mini running in FC Switch mode. I had a number of B200 M5 blades with the VIC 1340 and a storage array attached to the mini FI-IO modules.
You will require UCS version 2.2(4) or later to have the applicable options.
Note: As mentioned, these steps are for SAN booting. You will need to modify for local booting.
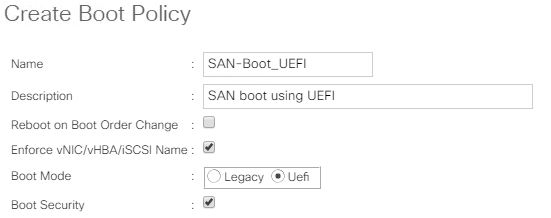
Creating a UEFI Boot Policy
- Create a new Boot Policy wherever appropriate in your UCS Manager organization.
- Give your Boot Policy a name and description.
- Enable the “Enforce vNIC/vHBA/iSCSI Name” option, assuming you are using consistent naming for your boot devices.
- Set the “Boot Mode” to “UEFI” and enable “Boot Security”.

New Boot Policy configuration - Under the vHBA section select “Add SAN Boot”.
- Select Primary and enter the vHBA name for your A-side fabric (for example:
vHBA-A)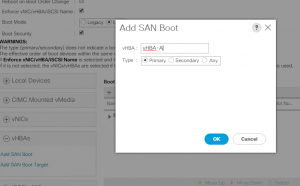
Adding vHBA-A to the boot policy - Under vHBA add another SAN Boot device.
Secondary will be selected, so enter your B fabric HBA name (i.e.:vHBA-B) - Now create the targets for your Primary Controller (fabric A).
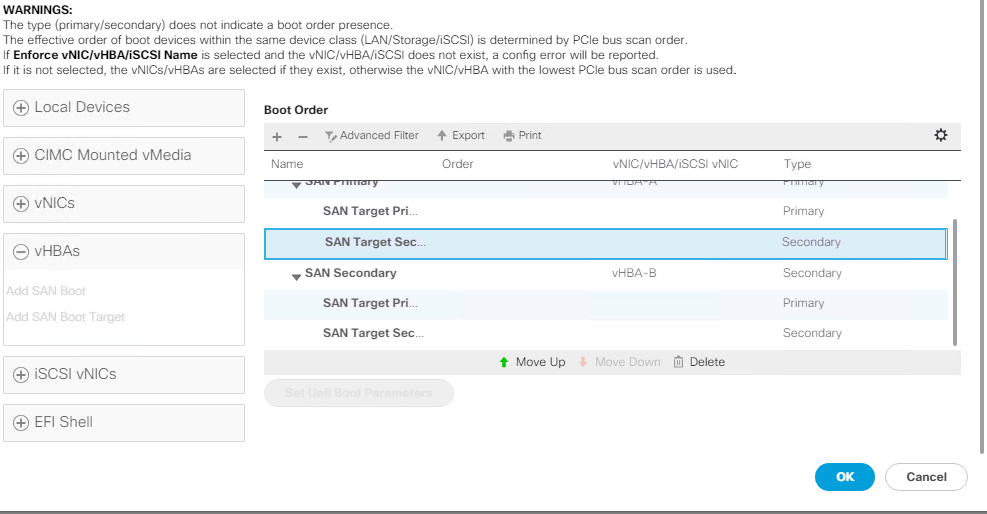
- Select the “Add SAN Boot Target” option and then select your Primary Controller.
- Enter the LUN ID for where ESXi will be installed to (generally LUN 0 or LUN 1).
- Enter the first WWPN for your storage array that is accessible on fabric A.
- Add another SAN Boot Target to your Primary Controller. Add the same LUN ID and second WWPN for your storage array.
- Repeat Step #8 for your Secondary Controller using the fabric B WWPNs of your array.
When done, it should look like the image below.
Boot targets added to HBAs - Now for your SAN Primary controller select SAN Target Primary. The “Set Uefi Boot Parameters” option will appear.
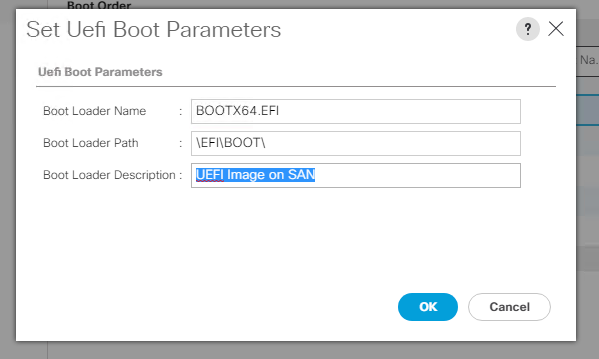
- Insert the settings below to configure the UEFI parameters:
- Boot Loader Name:
BOOTX64.EFI - Boot Loader Path:
\EFI\BOOT\ - Boot Loader Description:
UEFI Image on SAN(Or whatever you would like)
UEFI Boot Parameters
- Boot Loader Name:
- Repeat step #11 for each of your boot targets.
- Now apply this boot policy to your Service Profile/Service Profile Template.
- Install ESXi as you would normally and then reboot.

If you boot successfully then you’re in great shape. If this is a new domain with nothing else running you may want to consider testing booting by shutting off paths to storage. This is just to verify your UEFI boot parameters will work when or if your first HBA goes down.
If you do not boot successfully you will likely be dropped to the UEFI shell. This indicates that one of the following likely happened:
- The UEFI updated policy has not been used in the Service Profile.
- One of the UEFI parameters was incorrectly entered from above.
More Information
Troubleshooting from the UEFI shell
If you’re dumped to the UEFI shell instead of getting a booted OS quick way to find out is through the UEFI shell. At the shell you can enter the command bcfg boot dump. This will let you know if there’s any other boot loaders configured with this UEFI system. If you only see the UEFI Loader then likely UCS Manager didn’t insert the proper parameters, or your UEFI image isn’t present.
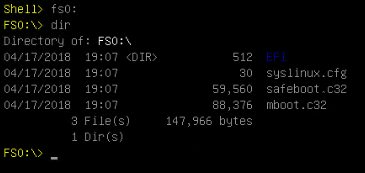
Assuming no other boot managers on ahead of your boot LUN (which should always be 0 or 1 to ensure it’s first), you should verify your boot loader is present on fs0.
Switch to FS0 by entering fs0: at the UEFI shell. You can then use dir to list the contents of that file system. If you see the contents below, which are part of the ESXi boot loader system, you have confirmed the boot drive is available in UEFI. At this point verify you have entered your UEFI parameters properly and try again.
Additional Resources
- If you’re curious about the ESXi boot drive partition setup check out Andrea Mauro’s blog post about ESXi 6.0 partitions.
- The Wikipedia entry on UEFI provides an extensive background on UEFI, including Secure Boot.
- Cisco bug report on ESXi using UEFI boot parameters
- VMware doc on ESXi and UEFI Boot Parameters
hi
how are you?
im looking at enabling secure boot. we use iscsi for boot.
struggling to see what i need to change on the ucs serv profile.
hope you can help
thanks
Hi Mark.
I have not configured iSCSI for boot on UCS in many, many years. However, instead of configuring the advanced boot parameters on the virtual HBA you’ll need to configure that on your iSCSI boot vNIC.
ok, how do we get this to work if esxi already installed?
thanks
I am unsure if you can simply swap to UEFI + Secure Boot, or if you need to reinstall. If I get some time I will test it in our lab.